The Chasms

I've been meaning to build something from my favorite fantasy series, The Stormlight Archive, out of LEGO for quite some time. If you haven't read the series, I highly recommend it! The books are full of magic, mystery, spellbinding fight scenes, wonderful characters. Not to mention, they a perfect escape from the real world during the time of COVID.

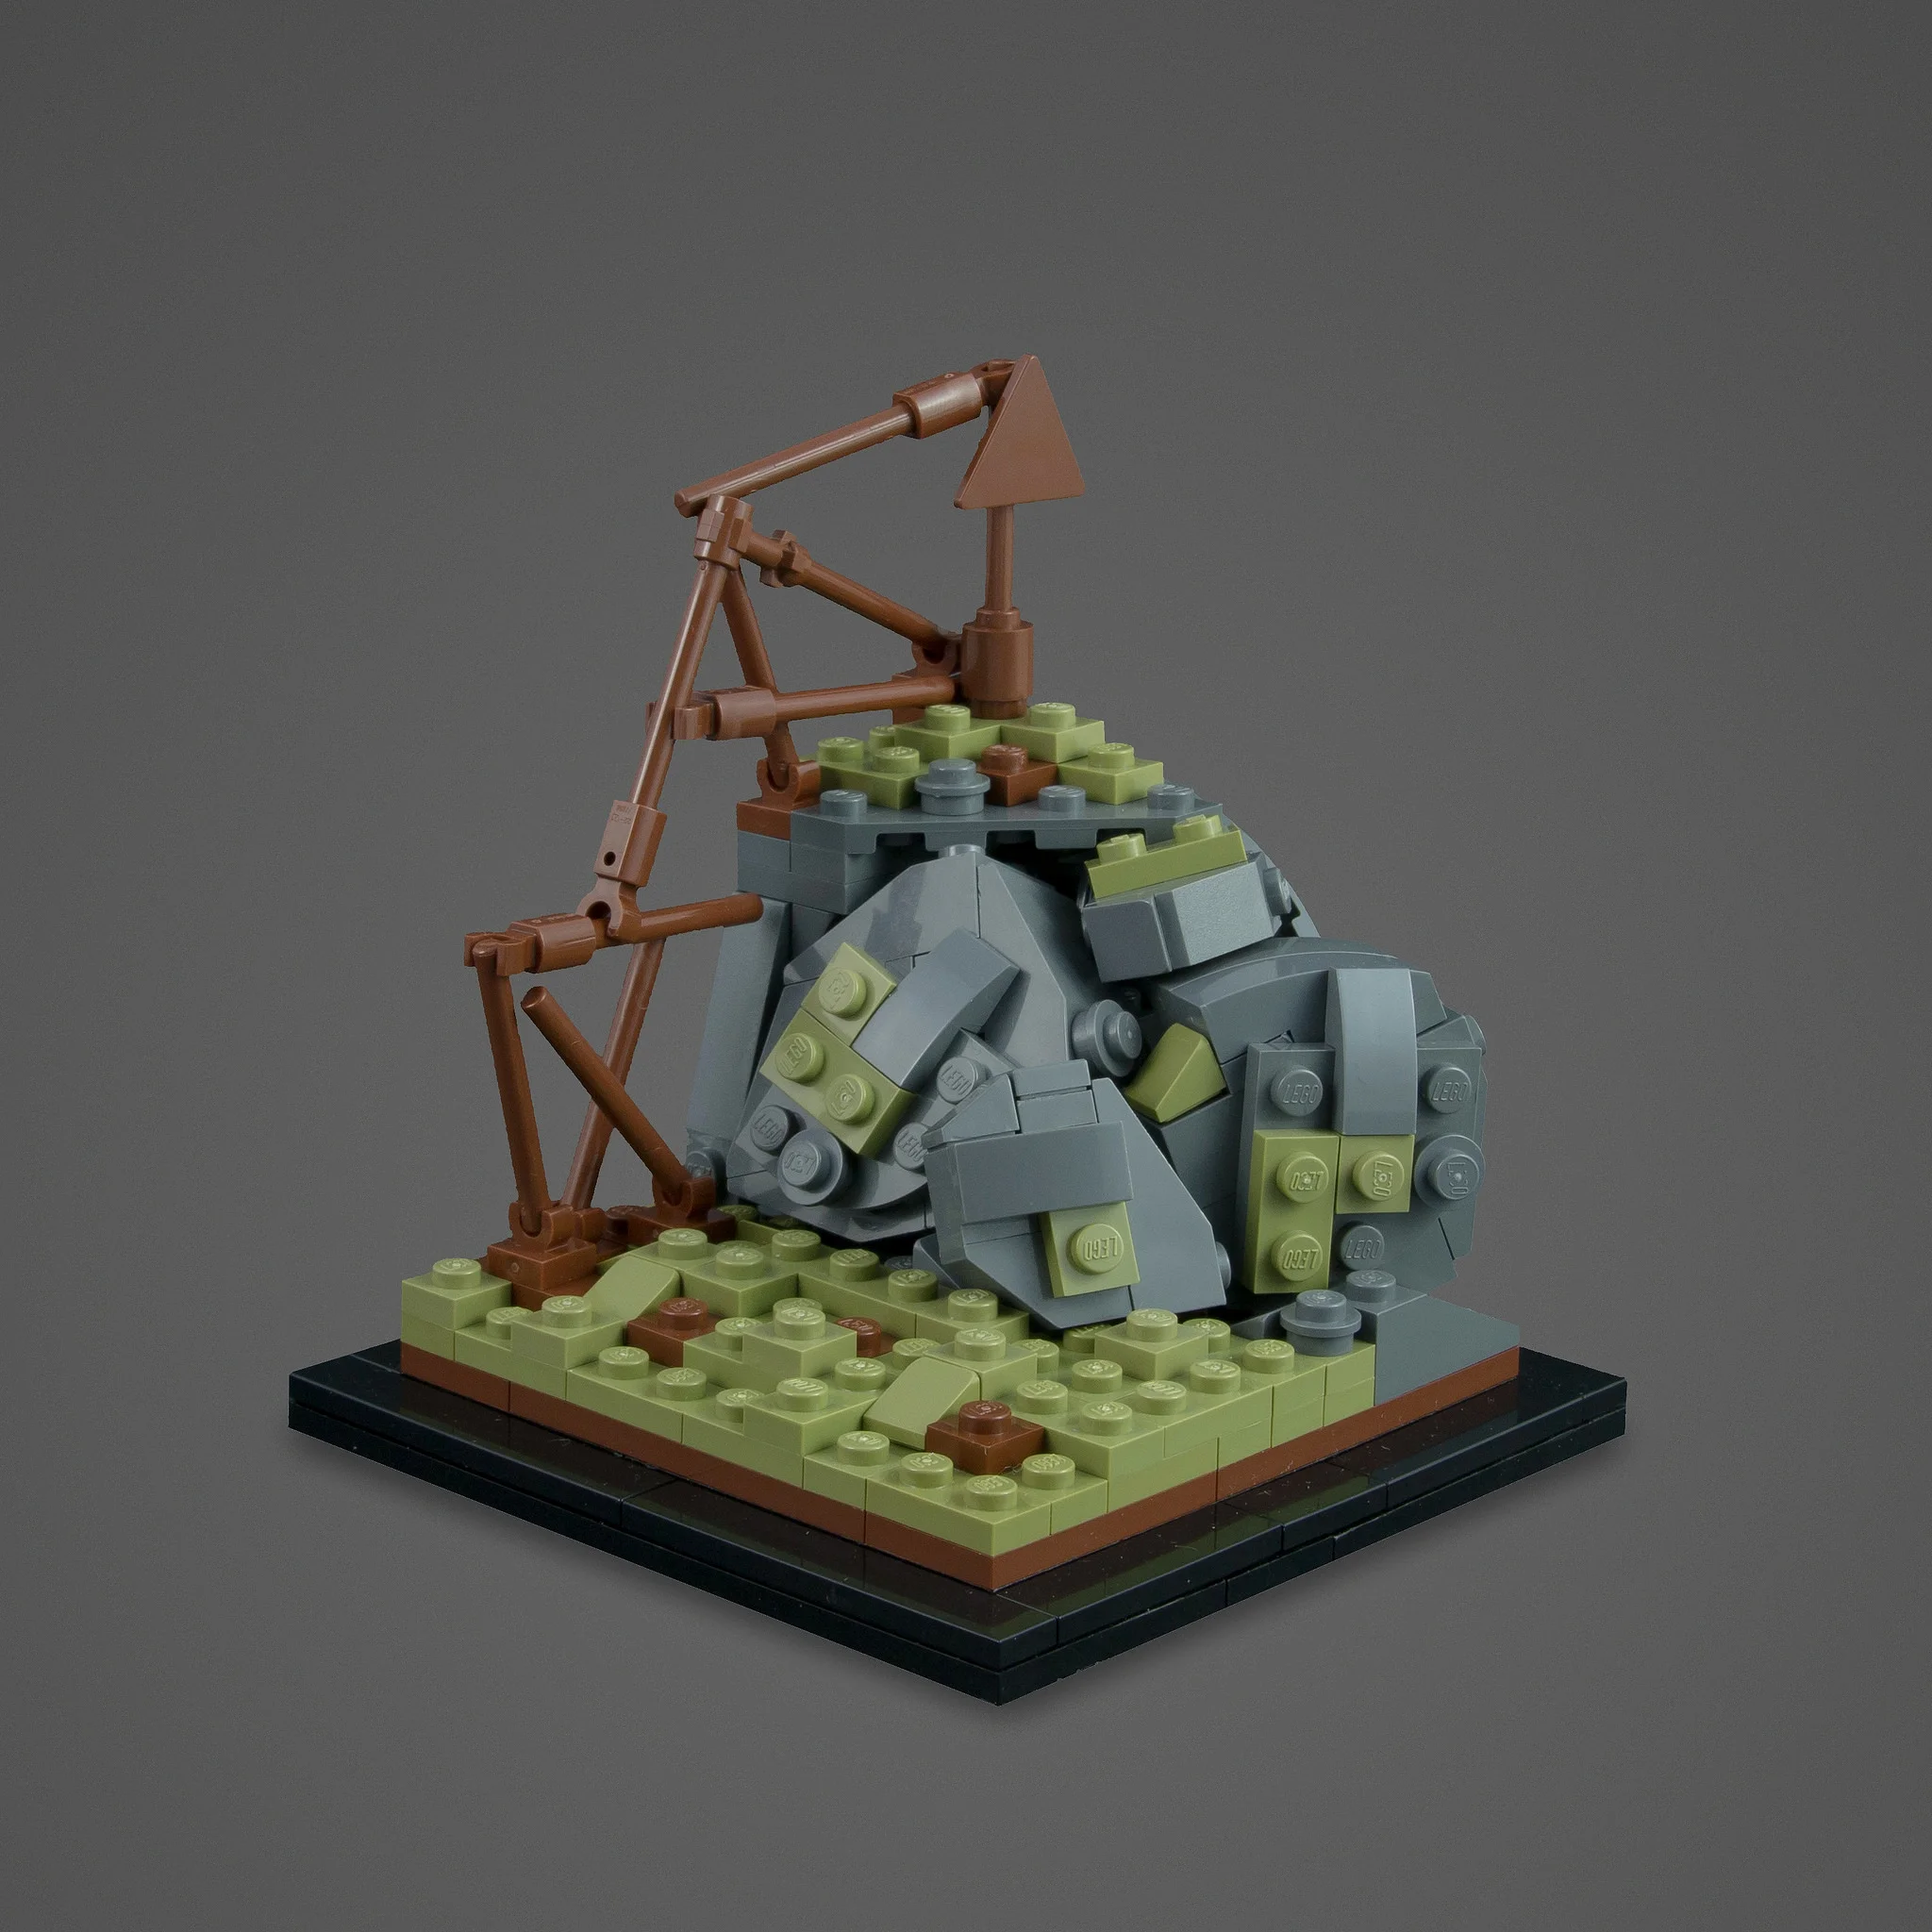
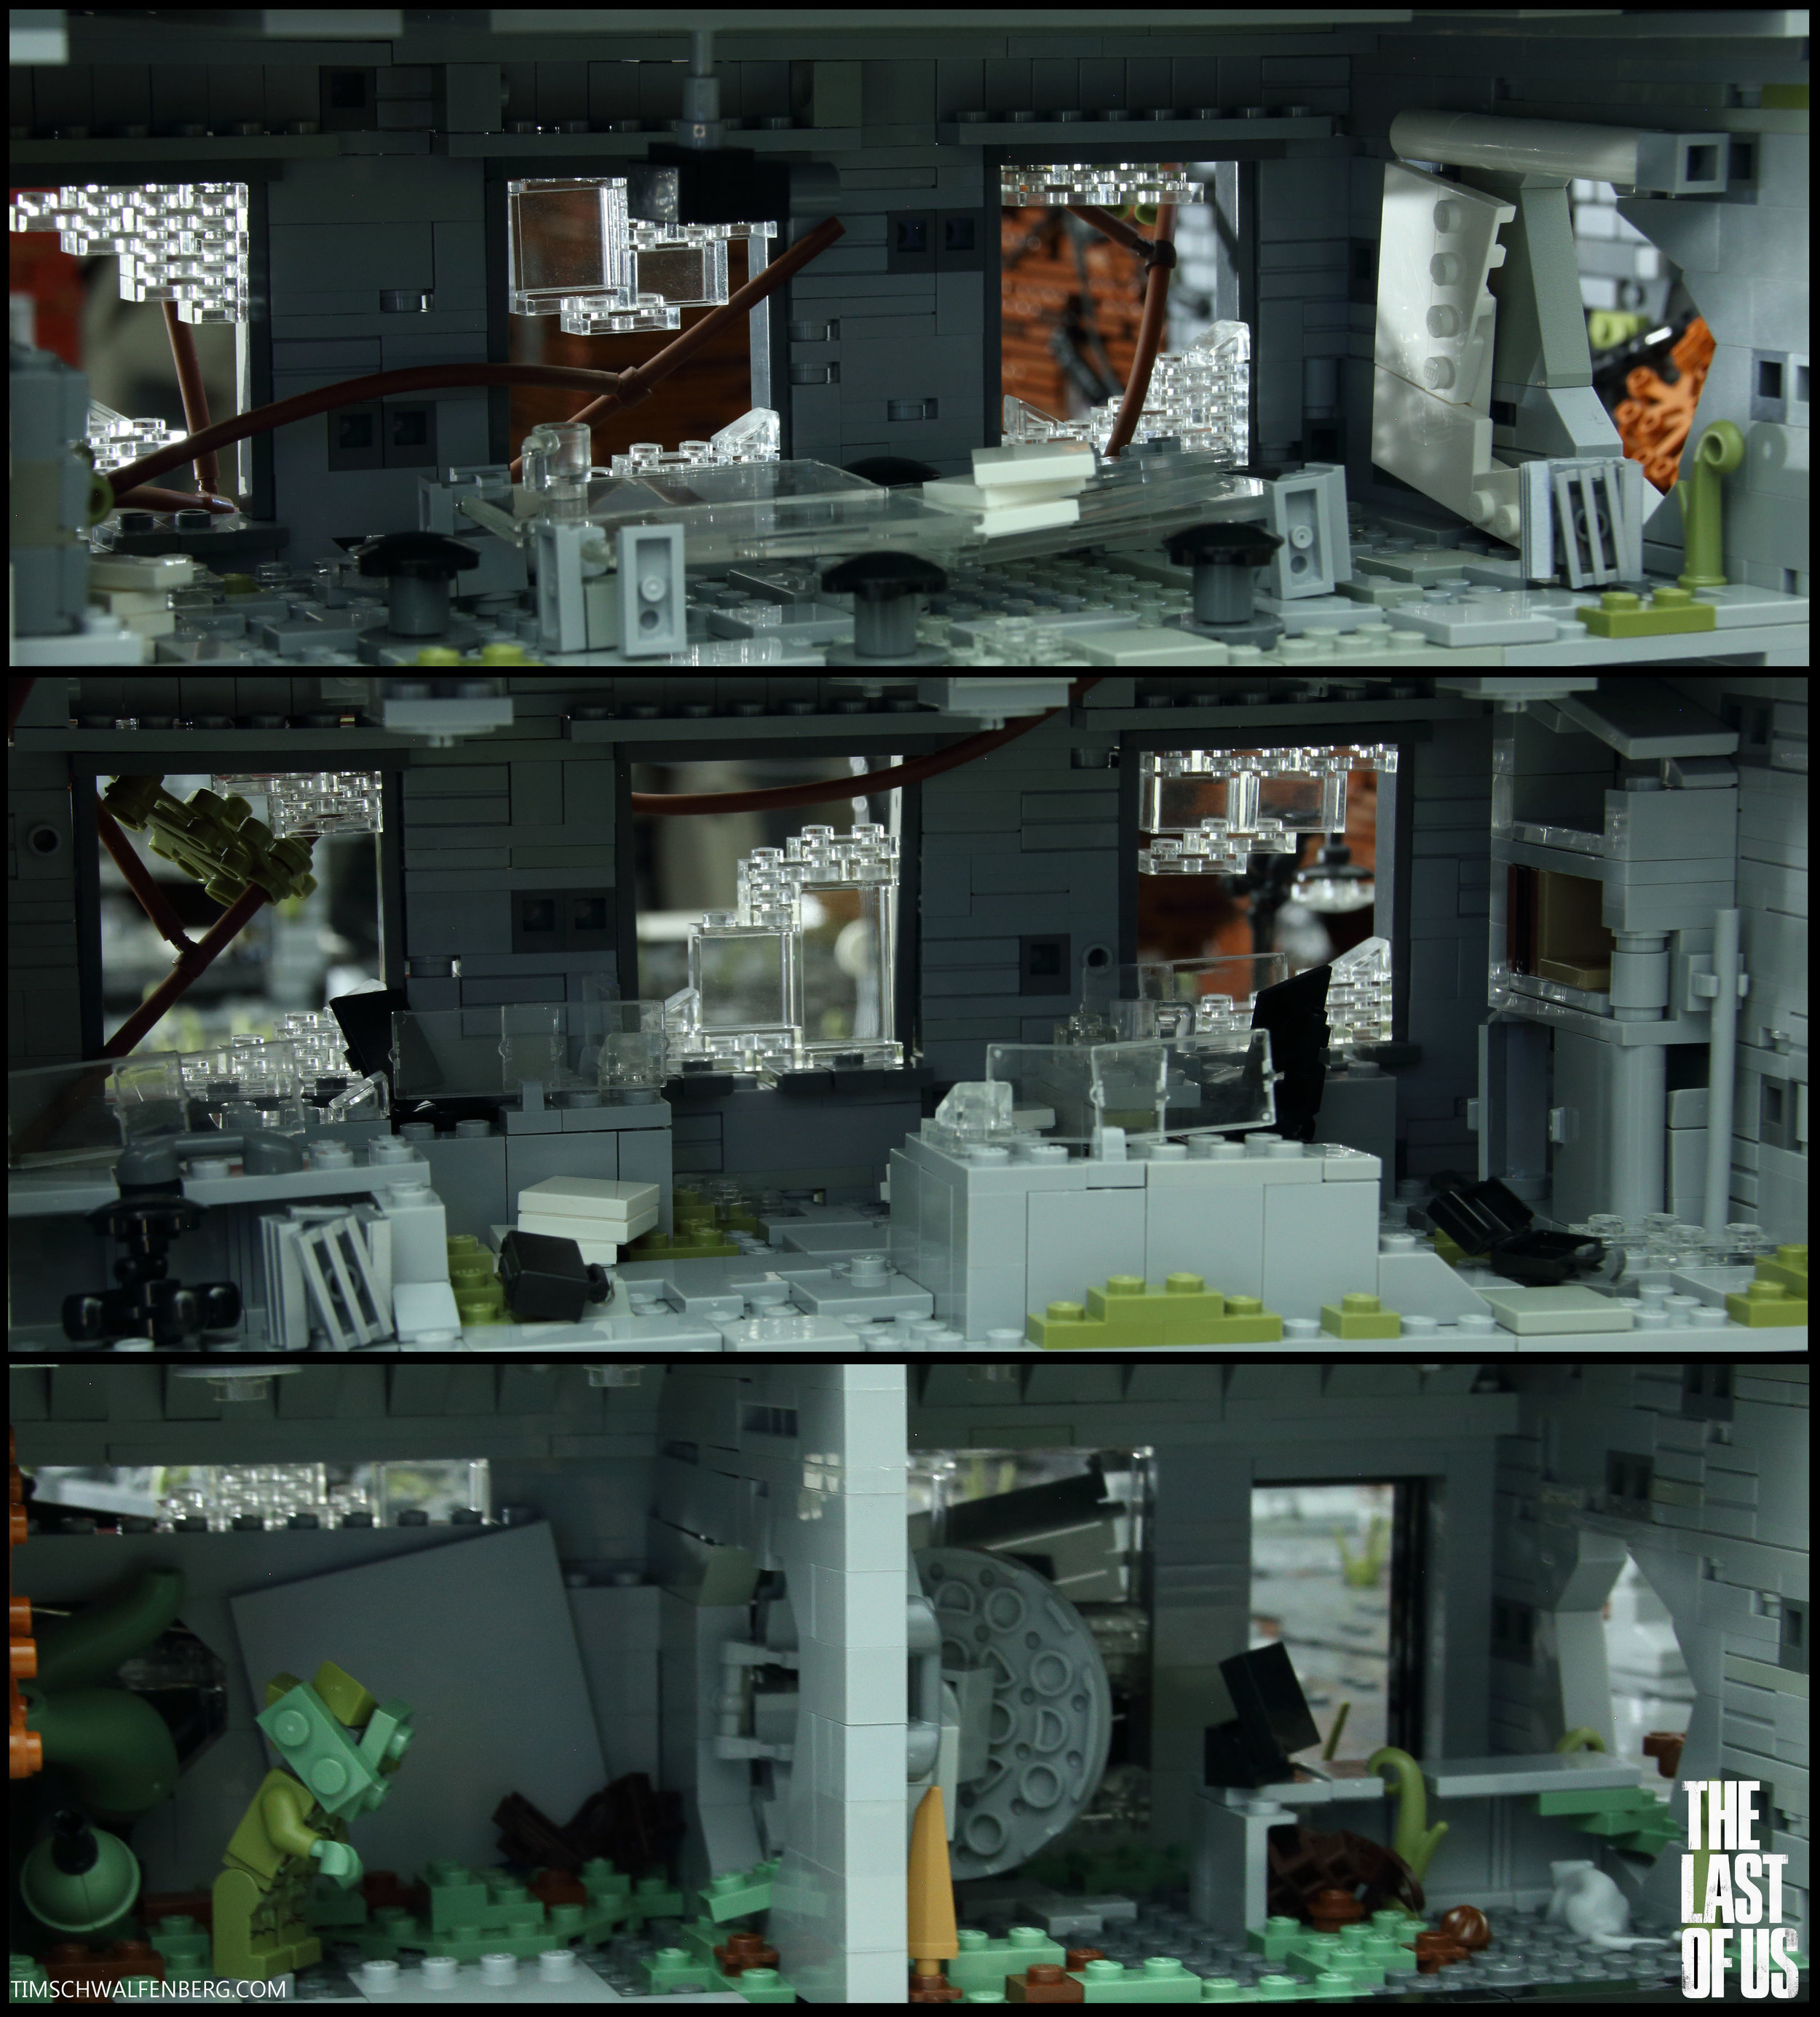
This is probably one of the tallest builds I have made in a while (in fact I would have made it taller if I hadn’t run out of bricks! It was a unique challenge trying to craft some of the unique flora and fauna from the world of Roshar, and as a whole, I’m happy with how it all turned out. I also had a lot of fun experimenting with lighting to try and get the effect of the blazing hot sun trickling down into the chasms.

The Chasms (1) - Lighter.jpg
The Chasms (3) - Lighter.jpg
The Chasms (4) - Lighter.jpg

Landscapes

Along with various trees, I also built several 8x8 landscapes for my LUG presentation. Each landscape was for a different biome: desert, ocean, tundra and mountain. 

The main focus of the desert landscape was the layers of rack strata, which was achieved using shades of tan and flesh colored bricks.

The ocean biome allowed me to experiment with several unique pieces for creating a coral reef.

39552004564_dcf8dc8abb_k.jpg

The tundra landscape used sloped white bricks to create the impression of snowdrifts.

Lastly, the mountain landscape used several offset boulders to form a small hill. Olive green was used to create the impression of moss covering the rocks.

39385264385_a9ab27bb49_k.jpg

Trees, Trees and More Trees

Recently, I presented a talk to my local LUG (Lego Users Group) about LEGO landscaping techniques. As part of the talk, I put together several different landscapes (to come in the next blog post) and a group of various LEGO trees so that the LUG members could get a hands-on look at various building techniques.

The first of these trees is classic LEGO form, with a reddish-brown trunk and dark orange leaves. Various clips and bar connections are used to give the leaves slight angles, which create a more interesting shape than if they were attached at right angles.

39263252205_51241ccab2_k.jpg

I also experimented with building a pine tree, using offset 8-sided bar holders as the central stem. It's probably my least favorite out of the various trees, but I've always found pine trees to be the most difficult ones to build in LEGO.

25302778917_2b308ca539_k.jpg

For something different, I also built a mangrove tree. The mangrove tree was made using a combination of flex tube, clips, whips and other brown pieces to create a spindly trunk.

Lastly, I experimented using chain pieces twisted around a central stem to create the texture of bark. While not the most stable tree in the world, I was pleased with how the chains curled upwards around the stem.

Do you have a favorite tree, or any tree building techniques you'd like to share? Let me know in the comments!

Bridge Between Worlds

As you can probably tell, I've always been a fan of science fiction. The ideas and possibilities the genre allows us to explore are truly galactic in scope. While on the other hand, the human stories that take place within these stories can still deeply affect our hearts.  One of my favorite science fiction series is Stargate, a show which, despite its humor, action and brainwashing Goa'uld always found a way to show the humanity of its main characters. This build, which shows a small team traveling through a wormhole for the first time, is a tribute to Stargate and all of the fond memories it has given me over the years. I hope you enjoy!

39865148671_85b7a61ff9_k.jpg
39819540611_fd7bb833b3_k.jpg

The Last of Us: Build Log

Building The Last of Us diorama was a long journey.  I knew that it was going to be big - larger than anything I had attempted before at the very least. While I normally build without any sketching or other planning beforehand, in this case I actually did some drawing (albiet poor drawing) in advance.

The original drawing was for two 48x48 baseplates, but that quickly grew to three 48x48 baseplates wide and 96 studs in depth. I also started to rough out a number of techniques that I wanted to try in the build. Some of the techniques made it into the final build, others were ultimatley rejected.

Having decided on some of the techniques that I wanted to incorporate, it was time to choose the colors for the build. I knew that I wanted to keep a subdued color palette, using earth tones combined with the shades of grey natural to modern cities. In the end, I chose olive green as my primary shade for the greenery in the city. At this point I had also decided on the colors of the buildings. I would start with dark red on one side and slowly transition from there to brown and finally to grey on the other side of the build. I wanted this to mirror the degradation of the city of a whole, with the creation becoming more monotone in color from left to right. With the building color and general design chosen, it was time to place some brick-link orders for the required parts.

At this point, I also began to experiment with 3D printing some bricks for the creation. I wanted to create a studs out brickwork texture, but LEGO hasn't made many slanted tiles that would create this. After some tinkering and experimenting, I settled on designs that provided a great texture and also had relatively good clutch power. The tiles were printed in PLA and mass produced over a couple of days using a flashforge creator pro.

The actual building started on December 16th, 2016 following my final university exams for the semester (I knew if I started before then I would get terribly distracted). The first day of building, I spent with my friend John Moffat. Much of it was spent framing the build as well as determining the points where the different modules could be separated from each other. We also began experimenting with the road and sidewalk textures as well as the beginning of the submerged street. We decided to keep the road dark grey, as it was a more natural color than black, especially considering the degraded state of the city. The sidewalk on the other hand, was made with a combination of SNOT and studs up work to give it a cracked texture. The Lamppost design was also decided upon. After the first day, the build looked like this:

I spent the Saturday working on more sidewalks and elevating the pads on which the buildings would be built. The blue portions show the areas where sidewalk would be going on top.

Another afternoon's work and the sidewalks were mostly complete

Over the next few days, I worked on fleshing out the rest of the road as well as the submerged section. I deliberately chose to make the road with old and new gray to help add to the deteriorated feel of the city. The entire road was made with SNOT, using headlight bricks to fasten it to the base beneath as well as to provide some texture. Building the road like this also allowed cracks and fissures to be created. In the midst of road building, I spent a couple hours building the submerged truck as well as the first of many trees. By this point the build had progressed significantly; it was finally starting to look like something!

The nice part about large projects like this is the ability to split it up into smaller chunks that are different from each other. After finishing the road, I was tired of building big grey slabs, so I shifted focus to building a bus. Once that was complete, I worked on fleshing out the massive hole in the middle of the build by that would contain the park section. For the path through the park, I decided on a cobblestone texture with vines growing across it to allow for the contrast between hard angles and organic lines. Benches were installed, the middle feature of the park was built and  then it was on to the buildings!

For buildings, I worked from left to right in a circle. For the dark red building, I focused on the fire escape, wall texture and integrating the Thor hammers I had received through LUGbulk in interesting ways. I wanted the texture of the wall to look worn, but not overly textured so as not to detract from the clean lines of the building. The next pictures show the red building in two stages of construction.

For all of the buildings, I focused on the exteriors, leaving space and supports behind, from which I would construct the interiors later. Following the red brick building, I moved on to the center grey building and the tree growing out of it, as the tree had to be completed before I could move on to the exterior of the center buildings, which would be built in tandem with the vines growing across them.

By this point, Christmas was just around the corner, so I took a couple of days off to spend with family, though I still managed to squeeze in a few more building sessions. During these, I created the outline of the two brown buildings. After this, I took around 5 days off to head out to the mountains and go skiing with my family - a well needed break from all the LEGO building

For those of you who were curious as to how the brown building texture was achieved, the above picture and the one below provide a good look. The outside was coated with black 1x2 plate with ladder pieces into which plates can be stuck with fairly good friction. You have to use the old mould of the part however, as the new ones that LEGO produces don't have the same clutch power.

After returning from the mountains, I got back to work finishing up the exteriors of the center buildings and working on the remaining two buildings. The final two buildings went up fairly quickly, as I had already established the type of wall texture that I would be using. The next picture gives a view of the buildings once their exteriors were complete as well as a picture of the space left for the interiors.

Next I focused on filling up the park. I created a statue of as the centerpiece of the park, but ended up rejecting it in the final build. It stole too much focus in the main photo. I was sad to throw it away - I spent a long time on the statue - but the final overall look of the build was more important than a single detail I was happy with. 

With the park mostly done, finishing up the top of the buildings. While I didn't end up taking any final photos of them, I'm quite happy with how they turned out

From this point on, only the interiors remained. As I had left SNOT bricks and other supports when building the exteriors, the interiors came together quite easily. Some interiors I built from the ground up. For others, I built some furniture on the side, which ended up forming a room. In all of it, I focused on using scatted, partially clutched bricks to give a run-down look seen in the game.

With the interiors done, I added a few more final touches - strings on the lamposts, trash in the park, to name a few. And then, on January 10th, it was finally finished!

The build was then carefully split up into sections and moved to the basement, where it was photographed

Unfortunately, I missed taking photos of the lighting setup I used for the final pictures, but I'll try to give a description. The build was too big to fit in my light-box, so I needed another alternative. I ended up aiming my lights at the ceiling to provide a diffuse light on the build. As the lighting was very low, I used long exposure for the pictures. For the interior photos, I aimed one of the lights at the ceiling and the other so that it shone though the windows, as if there was light coming in from the outside.

In the end, the photos turned out quite well. I desaturated them a little bit and edited the backgrounds in GIMP to add depth to the images.

Throughout the build, I had to make many decisions, which all contributed to the final product. At one point I considered skipping the interiors, at another point I considered scrapping the bus though I'm glad I followed through with both. I had planned to have an upside-down car sticking out of the submerged section up until the final stages of the build, but that went out the window. And there's always the questions: How many roadblocks should I make? how many vehicles? Where should they be placed? Are there enough vines? Too few? Does the white bus contrast too much with the rest of the build? Should the figs be at a different place? Are the colors right? 

It's those questions that, to me at least, make up the real build process. It also makes the build process that much more difficult to capture in a write-up. While I might not have been able to capture all of the nuances that went into the build, I hope that you've enjoyed following along. If you have any questions about how a specific part was done, let me know and I'll do my best to answer them.

--Tim


The Last of Us: LEGO Diorama

The Last of Us is a game that is truly a work of art. It combines scenes of beauty and brutality all while exploring the nature of humanity. With <i> The Last of Us: Part II </i> just recently announced, I thought that it was fitting to build a tribute to the masterpiece of the original.

This build was a long time in coming. It’s certainly the largest creation that I have worked on to date, measuring over 3.5 by 2 feet. I had a lot of fun experimenting with various techniques to recreate the atmosphere present in the game, and I think that they turned out well. It also features my most significant foray into 3D-printing, with one of the building facades being composed almost entirely of bricks that were made in my own basement.

I went to the extra effort of including interiors for all of the buildings, as I wanted the build to be view able from every angle. In the end, the whole build turned out better than I had hoped and I'm quite happy with how the pictures turned out as well.

I'll be posting a build log in the next couple of weeks to chart the progress of the build for anyone who is curious. Until then, stay tuned!


LEGO Carrier has Arrived

I recently finished up a version of the Protoss carrier from Starcraft using some brickbending techniques to capture some of its curves and overall shape. The carrier sustained minor battle damage in its travels to my local comic expo this past weekend, but I was able to rebuild it and take some pictures yesterday.

Overall, I'd say that the project was a success. It was frustrating at times , but I think the resulting curves managed to capture the elegance of the Protoss war machine. 

Quick Facts: 
Health: 250
Shield: 150
Max Interceptors: 8
Length: 100 studs
Build time: 6 days

Overwatch Characters

Over the past number of weeks I have been working on a series of characters from the Overwatch to display at my local comic convention at the end of September. To be brief, producing the characters out of LEGO was a challenge. There are only so many pieces to choose from when trying to capture the distinct shapes and forms of various characters, especially when many of the characters are made up of organic curves rather than the hard edges of more robotic characters for which LEGO is a more natural medium.

The design process was fairly iterative, and I personally lost count of the number of times that I redesigned Roadhog's head, but I think in the end each of the characters turned out pretty well. I'd love to hear what you think or what characters you'd like to see designed next!